We so badly need new furniture!
But like so many, we’re on a budget with the completion of our renovations our priority.
That means that we have to make due with what we have. The thing is, what we have is too large for our wee little house. :-(
Take our TV stand and credenza.
When we lived in our condo we had a long wall to fill, so I opted for 2 boxy and squat cabinets from Ikea. Side-by-side they actually looked pretty good… and their depth was perfect for our old tube TV. They worked just fine in our condo.

In our little house we certainly couldn’t fit both of the cabinets into the living room, let along have them sit side-by-side again!!
One cabinet fit pretty well along the obvious TV wall in our house’s small living room, but it was far from perfect.

Yuck!
Not only that, because the cabinet was squat (the wood legs were 3” high), it couldn’t sit back against the wall… and that meant that all the cords were visible as you walked into the room.
I hated it!!
And there’s more reason to hate it… it’s 26” deep, and that means that it interferes with movement and flow. It creates a real bottleneck through to the rest of the house!
Then we purchased a big screen LCD TV with surround sound (yes… I live with a man!). Can you image how stupid a thin TV looked on a cabinet that’s 26” deep?! Oh… and now we have even more cords and things then ever before. In fact, we now have a power-bar. Because of that power-bar, the cabinet stuck out at least 4” from the wall! So… the 26” cabinet AND 4” = 28” of ugliness! (Oops!! One of our sassy & wonderful readers caught me in an adding mistake so I’m back to correct it. 26 + 4 = 30” of hideousness! You’ll read below how FAB my Brian is… well, I rely on him for adding too! Haha!!) Even more yuck!


Can you imagine it?!
Well… like I said, we’re on a budget!!
Then the other day – out of the blue – Brian said to me, “I can cut down the cabinet we have.”
“Are you trying to tell me that I’ve been suffering for so long and you have a solution that would mean spending very little money?!” I responded.
Men! I figure he was tired of me moaning every time I looked at that cabinet.
I could totally see his vision and I was excited because I could blog about it!! HaHa! You know how it is… constantly seeking the perfect blog topic!
I was looking forward to tackling the project with him only to get a text message from him the other day saying that he’d cut up the cabinet without me.
Me: “Did you take pictures?!”

But he wasn’t completely finished. In fact, he needed my help to source out the new legs! WooHoo! I rushed home from work, he picked me up at the train and we dashed to Ikea to buy legs. And we found the perfect ones in the kitchen department. 6 inches tall, stainless steel.
When we got home, he showed me his handiwork.


And here’s a photo of the new credenza (pre-legs) with 10” gone from its depth!

I got to help put the legs on. Okay… truth… my job was handing them over to Brian AND taking photos!! Those are important jobs, you know!!


The final part of the reconstruction = Brian cut a hole in the top where the cords would tread down into his secret cord/power-bar compartment!


And now for the reveal photos!

I love it!!
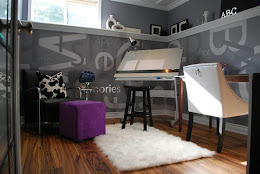
This is what it looks like now when I walk from the kitchen into the living room… flush to the wall and no more cords!

Please ignore our floors… they’re lovely with their walnut inlay, but in need of refinishing!

Now that the new credenza is 16” deep instead of 26” deep, you can see we have much better flow through to the rest of the house!! Fantastic!
So… yes, I can complain that he wanted a 46” TV… and yes, I can complain that he won’t let me spend money on new furniture… and yes, I can complain that he started work on this fun project without me AND that he didn’t take any before and during photos…
But in the end, all I can say is I’m crazy about this fella of mine!
He does wonderful things for me ;-)
I’m sharing this DIY transformation with It’s So Very Cheri’s Blog Hop AND with The DIY Show Off Project Parade over at The DIY Showoff! I hope you’ll drop in to see who else is sharing projects with me!!

P.S. I’m eventually going to paint our “new” credenza… any suggestions?


23 comments:
Victoria that really turned out great and everybody is happy that the best thing of all and of course doing it on a budget and loving it. Kudos to you and Brian!! Kathysue
What a great idea. This looks great, and I love the little secret cord compartment. So much sleeker, and you sure can't beat the price! I think you've got a keeper in Brian :) Kathy
It looks so good and best of all it's unique - not another one like it! It just goes to show that sometimes trying to save some money brings out the creative side in us! Fantastic transformation!
I just love that you repurposed this and didn't have to buy new. It looks great. The hidden power bars are the best.
Electronics are the worst thing to fit into a room I find. I keep wondering why you can get flat plugs that have 3 prongs for the grounding pin.......
I think your hubby needs a pat on the back from blog land. He did a great job.
that looks a million times better! we did our own ikea hack for the tv console, chopping a tall unit that was built to house a 32 inch tv down to one like you have. nothing beats free, right?
Hi Victoria!
WOW, what a great transformation! Isn't it amazing how creative you can be when on a budget? I don't like being in that position either, but am always proud of what is accomplished. And you both need to be very proud. I LOVE the new cabinet. It looks great ~ and it's just what you wanted! Thanks so much for your inspiration!
Sharlotte
Ms. Sharlotte's...Southern Reflections
Lucky you to have such a handy and accommodating husband! It looks great.
Love what you did about the cabinet. For me The cabinet look more beautiful because of the stainless steel legs that you put on it. Make it look more elegant.
Jane Taylor
window blinds liverpool quick tips on selecting the right shape and styling your room
Wow, that looks great! I could use a Brian in my life! Do you rent yours out? He does great work!
Amazing job. He deserves a big thank you for this transformation.
Awesome job! Ikea's gotta be the best hacks! We hack their kitchen cabinets and use them for bathroom vanities! Just don't understand why vanities cost so much more when they're essentially the same things... :P
That's a great transformation Victoria - and now you've got a custom credenza for your monster TV :) - which you love just as much as Brian don't you?
And btw, the last time I checked 26" + 4" equalled 30" :) hehehe
Waaaaay better!
Oh my gosh, what a great idea and creative DIY makeover! I love the cable camouflage, your hubby is a genius! I love the tall legs, that's something I always look for in furniture, it looks so airy and elegant. I'm sure you'll come up with the best paint color for your "new" cabinet by yourself, because you are such good designer =D
Such an awesome transformation Victoria!!! And Brian is the sweetest. I love that you say he was getting tired of your moaning every time you saw the cable cords etc, cause I think my hubby feels the same about my moaning about a lotta things around here... haha!
It looks so clean and tidy with no cables now!
PS. Your floors are AH-mazing!! I love them, the walunt inlay is gorgeous, I love homes with such detail.
Nancy
I'd paint it aqua if you have any orange accents in the room - I think I spied orange drapes in the next room over? Or maybe aqua is too much color -- maybe a pale light blue? I'm just really into blue these days!
Your man is so handy - I'm very impressed. And those floors? Do NOT need refinishing in my book. Ours are WAY worse. You know what we do? We use paint/stain and fill in the claw marks (from Dublin and from moving furniture) and think they look good as new. Ha! Great post Victoria!
First congratulations on having such a wonderful husband. I need a Brian too!!!
The project turned out really great. I love the metal legs. As for colour, I think with the black tv and the black speakers keeping it black will allow the area to stay cohesive. Just a thought.
cheers
Susan
I think he did an amazing job! The cabinet looks super trim on those legs. Hope you enjoy it. My house has taken foreeeeeever to even get to 3/4. I know how impatient it makes ya. Hope you'll have time to stop by. Jane F.
What a transformation! It's been fun to witness the evolution of furnishings as we've moved from bulky TV's on big tables or armories into less attention grabbing elements of rooms with flat screen TV's.
Beautiful job your husband did Victoria! It looks fabulous!
Fantastic job! That's a great looking cabinet. This project would be great to link to my Tips and Tricks Tuesday or Time Travel Thursday linky parties.
I would love for you to join in on the fun for all three of my linky parties each week:
ASK THE YANKEE - MONDAYS
TIPS & TRICKS TUESDAY
TIME TRAVEL THURSDAY
You can get the details here:
http://thebrambleberrycottage.blogspot.com/2010/06/brambleberry-cottage-linky-party.html
Each party runs for six days, so come on by!
Hope to see you there!
Liz @ the Brambleberry Cottage
http://thebrambleberrycottage.blogspot.com/
You've got a keeper! It looks fabulous, I love it when I can repurpose things (even when I totally want something new!). :)
This is so fab! I would love to know what he used to cut the cabinet down (tool)! it looks amazing you guys did a wonderful job! so smart...
Post a Comment
Note: Only a member of this blog may post a comment.