Pages

Showing posts with label Kitchens. Show all posts

March 22, 2009

Pondering my dream kitchen

candice Kelly @ JAX Decor & Design

In case you missed it, Paul over at Kitchen and Residential Design is holding this fab kitchen contest.

I’ve been organizing ideas in my head ever since the contest started. I was lying in bed last night, scribbling down ideas and making a sketch at 1:30 in the morning (with a bronze metallic pen, no less!!) I’ve been searching the Net for inspiration pics.

I have my dream kitchen all planned in my head… and now I can’t for the life me figure out how to use all the cool kitchen design programs I’ve downloaded. I can’t do amazing renderings like Michelle at A Schematic Life. I’m even pretty hopeless at drawing straight lines. And this is what happens when I draw stick people: 

stick-figures-humor-4

So I’m going to have to come up with some other way to get my dream kitchen out of my head and onto something more useful. I think I’m going to have to resort to this:

crowded_crayon_colors

Hey, whatever works, right?!

Figure out what works for you, and then send your dream kitchen to p.anater@gmail.com before midnight on April 2nd!

sig

March 11, 2009

Check Out The Competition!!

by Victoria @ Edin Interiors

I can never get enough of beautiful kitchens! :-)

To be honest I hadn’t planned on writing about kitchens in this post, especially so soon after showcasing the remodel of my condo’s kitchen, but today I received an e-newsletter – HGTV Pro Newsletter – highlighting the kitchen & bathroom finalists for the 2009 National Kitchen & Bath Association's (NKBA) annual design competition. As I was looking through the photos of these beautiful spaces I knew that I had to share some with you!

First, a little background… there were 679 entries in the NKBA’s competition, representing 10 different categories – categories like Powder Room, Small Bathroom, Medium Bathroom (etc.), Small Kitchen, Medium Kitchen (etc.). In the end 37 finalists were named, all vying for individual cash prises adding up to $100,000.

With 10 prize categories to chose from, which category and photos should I share with you? Considering my self-professed love of kitchens, this was an easy choice!

Medium Kitchens

(click on photo to go to the Designer’s website)

If you’d like to see more fabulous kitchens, or some lovely bathrooms, head over to the HGTV Pro website and check out more of the NKBA’s finalists. I plan on exploring the websites of these designer finalists, searching out inspiration for future projects – why don’t you do the same!

March 8, 2009

Everybody Loves a Kitchen Remodel!

by Victoria @ Edin InteriorsButterfly

Before we get to our Metamorphosis Monday transformation, there's one small detail we need to take care of... naming our giveaway winner!! Go here to see who the lucky winner of Matt's painting is :-)

Kelly and I really enjoy participating in Metamorphosis Mondays… a big thanks to Susan at Between Naps on the Porch for hosting this fun event every week!

Once you’ve checked out my transformation I encourage you to make your way back to Susan’s blog so that you can link up to other great bloggers and their fun and often dramatic metamorphoses!

I LOVE kitchen remodels… doesn’t everyone?!

Perhaps I should clarify. I love every aspect involved in remodelling a kitchen. I love planning the project and designing a kitchen’s layout; I love choosing materials like lighting, cabinets, tiles & all the solid surfaces; I love demolition and – of course – I love putting it all back together piece by piece. What about you? I wouldn’t be surprised if many of you love the transformations but can do without the stressful, messy process :-) Then again, many of you are like me and enjoy getting completely involved!!

My first full kitchen remodel was in our previous home; a condo built in the 80s and filled with not-so-lovely 80s finishings!

Here’s a photo of our kitchen before the remodel:

Kitchen - old aps and lights

Before we even decided for sure that we’d remodel the space we painted the walls in a terrific green (Ashwood, Behr – which we used as a jump-off point for our new kitchen’s colour scheme), installed crown moulding and purchased stainless steel appliances. But it just wasn’t enough! I little persuasive discussion with Brian and a trip to the bank… we were remodelling!

The first thing to go from the space… the oak flooring. I really liked the floor but at some point there had been a dishwasher leak and segments of the floor had rotted. It had to go. My plan = tile floor!

[06.10] Kitchen Reno 1

Unfortunately I had to work the day that the cabinet install guys came in – they removed the old cupboards and installed the new ones and I couldn’t watch!! I was totally disappointed (i.e., I couldn’t supervise: haha!). But when I returned home later that day I can’t begin to tell you how happy I was with everything! Of course we were far from done… apart from the counter install, all the labour from this point forward would be our own.

And the first thing we did… the floors!

Those of you who read my 6 Things post know the story of my first tiling job. Well… this was THAT tile job! Brian and I laid an anti-fracture membrane on the cement floor and then we did a dry-lay of my floor design. It was going to look fantastic! The next day Brian mixed the mortar and, to my surprise, set me to work trawling the mortar and setting tiles! I was afraid at first, but before you know it I was tiling up a storm!!

Here’s a photo of our dry-lay (test run)… we were using a lovely porcelain tile that looked like stone in an off-set pattern. It’s hard to see in this test-run photo, but I incorporated a slate (China Multi) trim detail too.

[06.10] Kitchen Reno 3

And here’s the galley-section of the finished floor!

Kitchen Floor

Yep… I tiled and grouted everything you see!!

I also tiled the eating area with a slate trim detail to define the space.

[06.11.09] Kitchen Reno 7

Next… the counters were installed. I opted to go with a quartz solid surface called SileStone in “Brazilian Brown” with a European profile (a thin slab [like a single sheet of real stone] rather then thick sided [two sheets laminated together along the counter edges]). I loved these counters and woulBacksplash Mock-upd highly recommend quartz to anyone!!!
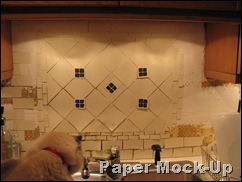
With the counters installed, we could finally tile the backsplash.

I want to share this funny picture… to be sure my tile pattern plan would work above the sink I cut out paper tiles and stuck them on the wall!!! :-)

Choosing the tile for the backsplash, designing how it would be laid out and – eventually – laying the tile (i.e., seeing my vision materialize) was so much fun!

The tile I chose – a tumbled travertine marble… take a look at the finished detailing over the sink:

Finished Kitchen 5

Yes :-) I tiled and grouted this, too!

And now for the final results…

Shaker style cabinets are a Cherry with a “Sugar” stain.
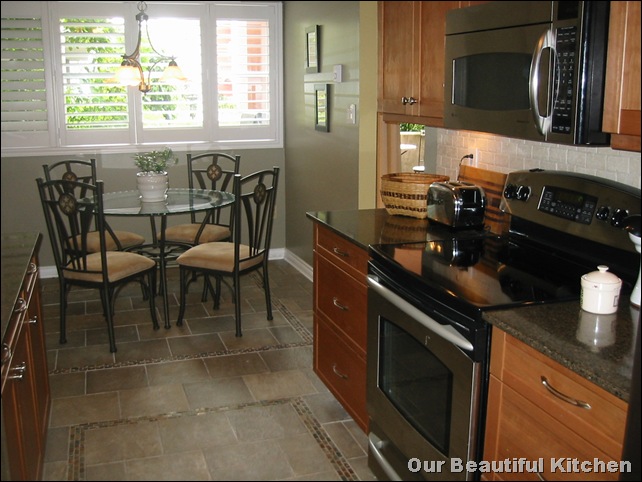
Kitchen 1

IMG_2095

IMG_2094

I hope you enjoyed my Condo’s kitchen remodel!

If you liked this transformation you’ll have to come back in a few weeks to see the metamorphosis of my current kitchen! I’m putting the final touches on things, but I’ll share it soon! :-)

Now… head back to Susan’s Between Naps on the Porch for more metamorphoses!!

February 10, 2009

Vancouver Interior Design: CondoMania, Part II

Victoria @ Edin Interiors
Do you want to see a great transformation? I love before & afters, don't you?!

In part one of CondoMania I shared a little about Kate - my first client - and some of the design issues found in her new condo. Light maple cabinetry & orange reclaimed wide-planked fir floors, red/grey/black brick 16' high accent wall & brown multi slate fireplace surround... all found together in a beautiful light filled space.

Today - Kate's kitchen make over!! Here are the before pictures I shared with you earlier:


Kate wasn't in a position to gut the kitchen and start from scratch (but that would have been fun!!) so we did the next best thing... we had the cabinets painted... black!


I absolutely LOVE the results! Look how fantastic the cabinets looks against the fir floors... and the orange/rust colours found in the slate backsplash are really highlighted against the black cabinetry, working to tie the floor colour into the overall kitchen scheme. Another benefit... the over-the-range microwave blends right into the cabinets, where before it was quite dominant. Finally, the kitchen no longer hides in the back corner.

Now... we need to paint the walls because the builder beige just isn't doing the space credit!

I could use a little help finding a light grey, actually... maybe you can help?! We've settled on Benjamin Moore's "Silver Fox" for a large wall further into the space (looks great next to the brick!), but I need a complimentary light, soft grey for the remainder of the main floor walls. I tested "Abalone" but it wasn't dark enough (more of a white) and it read a little too lavender. If you have any suggestions, let me know because we're scheduled to paint next Monday!

In the mean time, we have a finish carpenter coming in on Wednesday to install the fireplace surround I designed. I can't wait! I'll be sharing that transformation on Metamorphosis Monday, so make sure you come back!!

**********

Are you looking for a solution for your dated kitchen? Do you want to be filled with pleasure every time you walk into this all important room? Contact me by email and we can discuss your kitchen needs![sigv[3].jpg]

February 7, 2009

Vancouver Interior Design: CondoMania, Part I

Victoria @ Edin Interiors
Early last fall I got a call from an excited friend, eager to tell me she'd just bought her first condo and that she wanted my help to make it perfect. Considering I'd been fantasizing for years about creating my own home remodeling and decorating business I just couldn't say no; I jumped at the opportunity to take on my first "client"!

When my friend, Kate, started looking for her place she knew exactly what she wanted - a contemporary loft style condo. And she found a great place; a relatively new building (5 years old) built using reclaimed fir on the floors, reclaimed brick on a feature wall and with ceilings in the living room soaring to 17 feet.

As great as these features are, some of the materials choosen by the developer's designers have Kate and I shaking our heads. Take a look at these photos. The brick wall is fantastic and so is the Brown Multi slate on the fireplace, but the two materials just don't work together. Certainly it's about colour, but I also feel it's about the urban flavour of the brick coupled with a slate better suited to a classic transitional, less contemporary space.


The light maple plywood mantle didn't work for me, either. It "matched" some of the lighter, grained sections of the fir flooring, but overall I didn't like the two wood tones together. I also found that the mantle lacked weight and detracted from the overall drama of the fireplace. In real life, the mantle just seemed slapped on for a quick fix.


Both the fir floors (in fact, all the doors and trim in the condo are fir and are stained the same colour) and the light maple can be found in the kitchen, too. The colour of this cabinetry could be fine for an urban contemporary condo, but the style is actually a more traditional shaker. Not the urban look that Kate was interested in. I also felt that the light maple colour caused the kitchen to fade back into the corner.


After our first walk-through it was clear to me that to create the urban contemporary space that Kate wanted we needed to do a lot of work... and luckily for me Kate was on board! A little drama, some paint on those bare walls and a few new pieces of furniture, pulled together with a decorating plan. It'll look great!!

In future posts I'll show you some of our dramatic transformations - but no hints today!! :-) Okay... one hint... we have a builder coming in next Wednesday to install the new fireplace facade I designed (with a little help from my blog partner Kelly)!! I can't wait to share it with everyone!
**********
Are you looking for a design solution for a room in your home? Contact me by email and we can discuss your needs![sigv[3].jpg]

January 16, 2009

A Smidge of Creativity, Collaboration... and Where It Takes You!

Victoria @ Edin Interiors
I never imagined that I’d find myself building a home decorating and remodelling/renovation business. Who’da thunk?!

I grew up with two very talented, creative people and it never once occurred to me that I was creative too. Hey, I’m not knocking myself here… this was just my reality at the time and it never bothered me in the least. Rather, I was – and continue to be - enormously proud and in awe of Brad, our mom Laura and their extraordinary talents. Perhaps being embraced by their creativity meant that a little rubbed off on me? Or perhaps I had a smidge of my own all along…

Laura had a lot of interests, but she shared with me her love of interior decorating and houses. She was particularly fond of little “gramma grampa” houses and, as it happens, my partner and I currently live in a little house that we love (we better love it considering all the remodelling we’ve done)! I think she would love it too… once she made it up all of our stairs!! She also painted three little pictures of houses that I’ll have to take photos of and share with you all because they’re so special… one day :-)
As a child I loved watching her decorate our homes and, where I could, I would help. Sometimes that just meant helping to move the sofa with my spindly little-girl arms and legs! But as I grew older I’d get to help with the layout of furniture in a room or art on the walls; the placement of chotchkies on a shelf or china in a cabinet; the choice of fabric for the drapery or the style of wallpaper in the kitchen (we papered the walls AND ceiling in our little duplex at the top of Burma Road, Ocean Falls! Fantastic memory!!). We’d often have conversations about the flow of our home and how much better it would be if one wall was removed and possibly positioned in another place. Or we’d talk about how terrific it would be to build a deck off the dining room and install French doors. And, of course, we’d cruise neighbourhoods falling in love with houses.

The idea of having my own home one day, where I could do things like this and more, was my ultimate dream. And even though I rented for many, many years I always did a little something… everything from positioning furniture to painting rooms. I even removed carpet from one of my kitchens (yuck!) and replaced it with peel ‘n stick tiles. Debbie Travis in her Painted House told me I could do it, so I did!! Ha! Then I met Brian and soon had a place of my(our) own. Fortunately for me Brian is an agreeable sort… over the 5 years we’ve been together we’ve gutted kitchens and bathrooms, torn down and rebuilt walls, tiled floors and walls, laid laminate and hardwood floors… and Brian has done some wonderful finish carpentry while I’ve painted and painted and painted. Phew!! There’s more, but I think you get the idea!

Along the way I’ve learned something about myself: these projects I’ve designed and either performed or spearheaded are a reflection of my own personal creativity and talent. I’ve also learned something even more important: almost every project I engage in is the product of collaboration… I’m not just tapping into my own abilities but into the vision and talent of others. Together, with Laura or later with Brian, I’ve created beautiful homes.

So… that’s what I want to be at the heart of EdinDesign Interiors… a collaboration of ideas, vision and creativity. But that’s a topic for another post!!

Thanks Kelly for jumping in with the first post and breaking the proverbial ice of our new blog.
This is going to be fun!


My first post is shared in memory of
Laura Lorraine Lambert Petrie; my Mom.