Pages

Showing posts with label Kitchen. Show all posts

March 14, 2010

Ottawa interior decorator: The real & official kitchen makeover post

tulips RS2 If you’ve been following DesignTies for a while, you might remember my Weeehooo!!!! Time for a new kitchen!!! post from last May. Yes, last May — almost 10 months ago. And you might have noticed that there hasn’t been a “Here’s my new kitchen!!!” post since then. Well kids, the time has finally arrived… after ripping out tiles & drywall, drilling holes in the ceiling, big-time countertop aggravation, a fresh coat of paint on all the trim, two coats of paint on the cabinet boxes, four coats of paint on the walls, and transporting 50 cabinet doors and drawers to and from the painter in a smart car, our kitchen is done. Well, 99% done. But who knows how long that last 1% will take, so here it is… our kitchen makeover!!

This is what we started off with:

before

There was nothing really wrong with the kitchen structurally. The cabinets are solid wood, the layout is functional, the appliances are all relatively new and work fine… it was all the stinky pink that I couldn’t stand. Not to mention the laminate countertops had bubbled up along the seams in a crock pot incident.

counter & basksplash before

It took eight years to convince hubby to get rid of all the pink. But once we finally got started, there was no turning back!!

First we selected the granite for the countertop — Brown Cabernet.

CabernetBrown 3

We selected our slabs in May, but we weren’t ready for the templating till August, which is when the sink arrived. And we had to so some demo — no major demo, but hubby decided the best way to remove the backsplash tiles was to take down the upper cabinets and actually cut out the drywall along with the tiles. Even the walls behind the cabinets were pink!! Seriously. Here’s proof:

pink wall

We also had to remove all the window trim. At this point, I decided I liked our kitchen better without the upper cabinets. But hubby was like, uh, yeah, right — NOT HAPPENING!! But, I did manage to convince him to replace the window sill with casing. A small detail, but that extra inch or two of room behind the sink makes a big difference.

So now we have freshly drywalled walls and a granite composite sink from Kindred in Havana (the colour, not the city in Cuba!!).

sink close

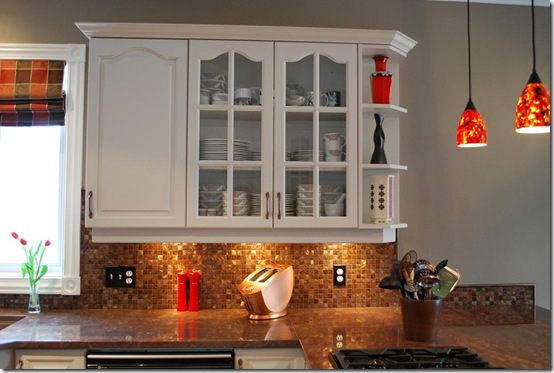
We decided to install pendant lights above the peninsula. I wanted pendants with copper shades that cost $150 each. Hubby found pendants with swirly red glass shades at Home Depot for $30 each. Guess who won this stand-off…

pendants 3

But actually, these pendants add great colour to the kitchen. Plus hubby’s the one who had to go up into the attic to drill the holes and install the junction box, so I had to humour him ;-)

Hubby wanted to widen the peninsula and create an eating area on the counter, so he built a bank of cabinets along the eating area side:

new cabinets

Now we’re ready for the countertop. Oh, the countertop. The %$#^#$!% countertop!! We waited for the granite. And waited. And waited. And… you get the point. Almost two months after the templating was done, the countertops finally went in. Beautiful stone, but shitty workmanship on the install. Unpolished edges, uneven seams, and the faucet wasn’t centered. Not to mention the granite wasn’t sealed. Trust me when I say DO NOT DEAL WITH CLASSIC TILE & MARBLE IN OTTAWA. Unless you like delays, inferior workmanship, and general all-around BS. But that’s a post for another day — this is a positive and happy “Yay, my kitchen is finished!!” post :-)

Upper cabinets back in place and countertop, sink, and faucet installation done:

peninsula faucet

Next came the uber-fantabulous mother-of-pearl backsplash tiles from Mirage Glass Tiles that the uber-fantabulous Paul at Kitchen and Residential Design recommended. LOVE THEM. They are absolutely stunning and gorgeous. Paul is a genius!!!

tiles
So that’s what we did on my birthday — the big backsplash install :-) Happy Birthday to me!! At some point, I painted all the trim in BM Cloud White. And then I painted the walls Sherwin Williams Balanced Beige — another great suggestion from Paul :-)

I had painted the switch plate covers in the kitchen copper years ago. They didn’t quite work with the brown tiles, so I pulled out a can of oil rubbed bronze spray paint, and voila, brand new (looking) switch plate covers :-)

switchplace cover

Now we had to agree on a paint colour for the cabinets. I wanted dark, he wanted white. We sort of met in the middle, although I think he got a colour closer to what he wanted. That being said, I do love the colour we decided on — Benjamin Moore Edgecomb Grey.

edgecomb

So the week before Christmas, we took down all the doors and I brought them to RLD Industries to be painted. Unfortunately, they had a big job to do for the military and then they were closed over the holidays. They said they’d try to have the doors ready by the end of the first or second week of January. So this is what our kitchen looked like for three weeks:

no doors

As you can see, the cabinet bodies are no loner pink. YAY!! I painted them over the Christmas holidays. I also painted the big coffin light fixture on the ceiling Cloud White to make it disappear as much as possible.

Unlike our crappy granite experience, our RLD experience was awesome — the doors and drawers were ready at the end of the first week of January. Yahoo!! And the quality is fantastic. No way could we have painted them as well ourselves.

doors close up

We kept the brushed copper door hardware, which saved us a couple of hundred dollars. I’d already convinced hubby to replace the original cabinet hardware with these copper handles about 8 years ago, and he wasn’t going for replacing them again!!

Once all the doors were hung, I realized there wasn’t enough contrast between the cabinet colour and the wall colour. UGH!!! I ended up repainting the walls a darker version of Balanced Beige — somewhere between Tony Taupe and Virtual Taupe.

tony taupe virtual taupe

So now that I’ve teased you with all these “in progress” shots, here it is… our finished kitchen (minus the artwork and the stools that hubby is making). Just to remind you what it looked like before…

before

…and during…

no doors

Here it is, the after!!

from eating area 1 RS

Here’s a tour around the room, starting with the window wall…

window RS

glass cabinets RS

Moving along to the peninsula…

from beside fridge RS

Looking from the peninsula towards the patio doors. The curtains are custom-made — I love the look of the horizontal stripes :-)

curtains RS

And to the wall opposite the window wall…

from eating area angle 3 RS

Here’s a close-up of the niche:

niche RS

And a few more random shots…

looking down from FR 1 RS

looking up 2 RS looking up RS looking down from FR 3 RS   looking down from eating area RS

Whew!! I know it’s a long post, but just think — it took a lot less time to read about the makeover than it took to DO the makeover!! ;-)

Thanks again to Paul, and also to Susan at Moving Designz for re-affirming our Edgecomb Grey selection. And thanks to all our readers who commented on my previous kitchen posts with their thoughts and suggestions :-)

And finally, no makeover is complete until it’s part of Metamorphosis Monday over at Between Naps on the Porch!! If I haven’t tired you out with my kitchen makeover, head over to BNOTP to check out what other makeovers people have been up to lately (or over the past year!!) The Met Monday blog party starts at about 8:00 tonight…

sig new

December 1, 2009

Compromise sucks, but you do what you gotta do

What do you do when you want sexy super-dark brown kitchen cabinets and your hubby wants not-so-sexy white cabinets?? Why, you have a battle to the death, of course!!

funny-cat-fight

Hehehe!! No, not really — although that might have made the decision-making process easier!! ;-) What you do is compromise. And paint lots of samples on every available piece of cardboard. And then you patiently explain to your hubby why five colours that look exactly the same to him really aren’t.

So here are our finalists. The virtual colour chips are from myperfectcolor. They aren’t quite true-to-life, but you get the idea :-)

shoji whitegray mistNovember RainEdgecomb grayWorldly gray   

And the five contenders with the wall colour, Sherwin Williams Balanced Beige:

greys

Here’s a shot of the countertop & backsplash…

backsplash 2_thumb[1]

So can you guess what colour we chose?? Leave a comment and let me know what your choice is. I’ll show you the sample door with the new cabinet colour as soon as we get it back!!

Meanwhile, hubby and I are back in our happy place and all is right with the world…

funny-cat-wallpaper-1

sig new

June 1, 2009

From 1939 Sad to 2009 FAB ~ My Kitchen!

Phew! I’ve just spent the weekend re-painting our kitchen – it went from a pale sickly yellow to a warm yellow called Powell Bluff (Benjamin Moore)… and I think it looks fantastic! A great big thank you to Maria Killam from Colour Me Happy for her help in choosing this lovely colour!Butterfly

In the great big scheme of things though, changing the wall colour of our kitchen is small potatoes compared to it’s original transformation a little over a year ago! And since this is Monday – the very day that Susan from Between Naps on the Porch hosts her fun and popular weekly blog party Metamorphosis Mondays – I thought I’d share the complete and dramatic before and after of our kitchen!

In the beginning (2008) there was a little bungalow built in 1939 with an original and pretty damned ugly kitchen!

Here’s the evidence… photo taken on move-in day:

IMG_2099

The same view this evening…

DSC01867

I’m CRAZY about my farm sink!!!!!!!

How about this…

IMG_2100

HaHa! Move-in day again. And my old pup, Simon… he likes to hang his head in my photos!! :-)

Again… same view…

DSC01863


Hey… I’m not done sharing yet! Here’s another angle of the room, transformed!

IMG_2112

DSC01864

If you’ve read my “Project Overload? Never!” post you’ll know that we’ll be installing a window in that far wall sometime this summer and I’m so looking forward to being able to look out to the backyard while sitting at the little bistro table! Once the window is installed we’ll complete the paneled wainscoting on that wall (if you look closely you can see that there’s nothing there except the originally sickly yellow wall paint).

So… Do you like what you’re seeing so far?

How about some pics of mayhem??!! LOL!

[07Dec27] Kitchen Tearout 4 [07Dec27] Kitchen Tearout 8 [07Dec27] Kitchen Tearout 10

[07Dec28] Kitchen Tearout 6 [07Dec28] Kitchen Tearout 8

And some photos of us putting it back together…

[08Jan] Drywall 1 [08Jan] Drywall 3

[09Jan08] Brad & Shelley


This is a fantastic photo of my brother Brad and his partner Shelley… the were so unbelievably helpful during the drywall phase of our remodel, sanding until they were almost unrecognizable! Ha! Love you guys!!


Below… photos of me happily tiling and my handsome Brian installing the stair railing.


[08Jan06] Tile Floor 2 DSC00145 DSC00167


Enough of that boring tear-out and rebuild stuff… you’ve come to see and read about a metamorphosis!

New Beem

DSC01852 

See… there’s my Simon, hanging his head again! HaHaHa!!

While I’ve got you looking down… like my tiling handiwork?

IMG_2002

Again… same view:

DSC01858

And this is the view of the kitchen from the dining room…

DSC01860

I’m a little sad… the transformer in one of our beautiful stained glass pendant lights has been damaged and has to be replaced. Until that’s done, only one of the lights works… so I can’t show you how pretty they are when they’re all lit up. :-( Well… I can show you the one light!

DSC01872

I love our back door and I’m soooo looking forward to the day when it accesses a fan-tabulous back deck! I still have to paint the exterior side, but I haven’t decided on a colour yet! Maybe a dark red like the front door??

DSC01847

DSC01869

DSC01855

My granite – Crema San Marco. Love the colour and veining!

My backsplash is a combination of taupe subways and glass listellos (not loving my backsplash) :-(

And a last look at the breakfast area…

DSC01870

So.. now you’ve seen one of the largest transformations in our little house to date. The space was so much fun to design and remodel… and equally fun to share with you! It’s time for you to head back to Between Naps on the Porch so you can visit the other metamorphoses found in this week’s blog party… that is, after you’ve said “hello” to me in a comment of course!

Thanks for dropping by!!

Victoria from Edin Interiors